Scalingo for MongoDB®
Scalingo for MongoDB® is the official MongoDB® addon provided by Scalingo, details on the available plans can be found here. This addon gives your app instant access to a MongoDB® database running in its own Docker container.
Adding Scalingo for MongoDB® To Your App
You can add the Scalingo for MongoDB® addon through the Dashboard or through the command line interface. The capacity of your database is elastic, you will be able to upgrade it later.
Through the Dashboard
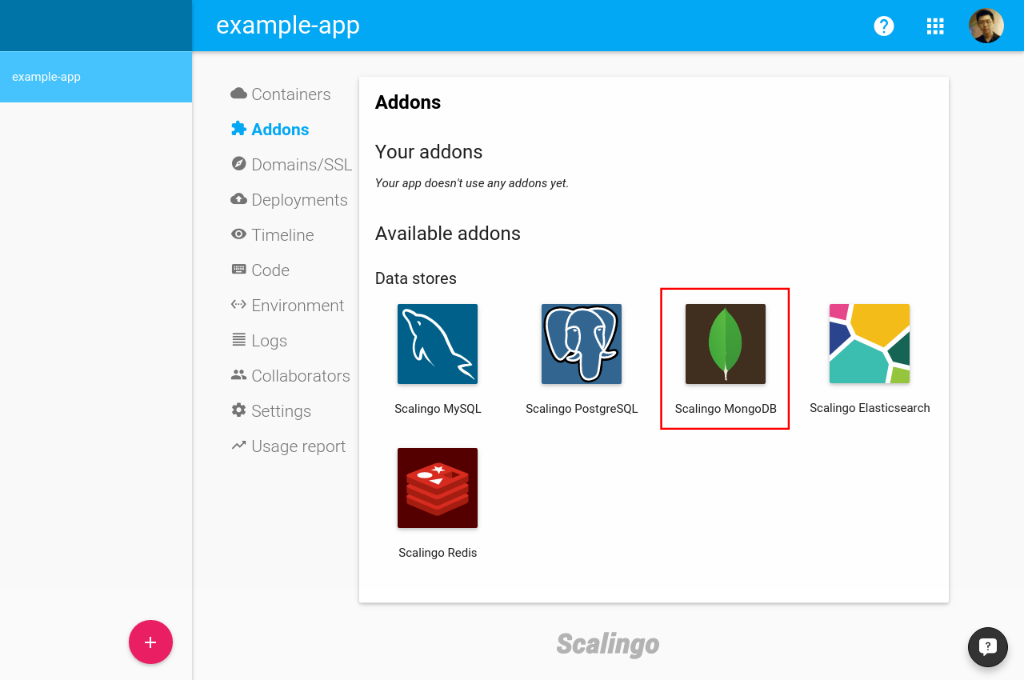
- Go to your app on Scalingo Dashboard
- Click on Addons tab
- Select the addon you want to add
- In the dialog select the database plan you need
- Validate your choice
Through the Command-Line Interface
$ scalingo --app my-app addons-add mongodb 1g

-----> Addon mongodb has been provisionned
       ID: my-app-3030
       Modified variables: [MONGO_URL SCALINGO_MONGO_URL]
       Message from addon provider: Database successfully created
This command will provision the application my-app with a 1g Scalingo for MongoDB® database plan.
To find out what other plans are available:
$ scalingo addons-plans mongodb
Scalingo for MongoDB® Replica Set Setup
If using a Business plan for your Scalingo for MongoDB® addon, we setup a MongoDB® replica set. It has the following configuration:
- 2 data nodes: one is the leader and the other is the follower. The leader receives all query to the database.
- 1 shadow data node: this node is used for backups.
- 1 arbiter: it does not contain any data. It’s purpose is to take part to the vote in case of failing leader.
The communication between the MongoDB® nodes is encrypted.
Getting Your Connection URI
Once the addon is provisioned, 2 environment variables are added to your app: SCALINGO_MONGO_URL and MONGO_URL. MONGO_URL is an alias to SCALINGO_MONGO_URL for the convenience of some libraries such as the framework Meteor or the Ruby gem mongoid, but using SCALINGO_MONGO_URL is preferred in most cases. To find out how to use them in your code please refer to Application environment.
In most cases, you can pass the variable directly to the client library you are using in your code. But sometimes the library requires a specific URI format, you’ll need to add a little bit of code to suit the library.
You can get those variables from the Dashboard or the command-line interface.
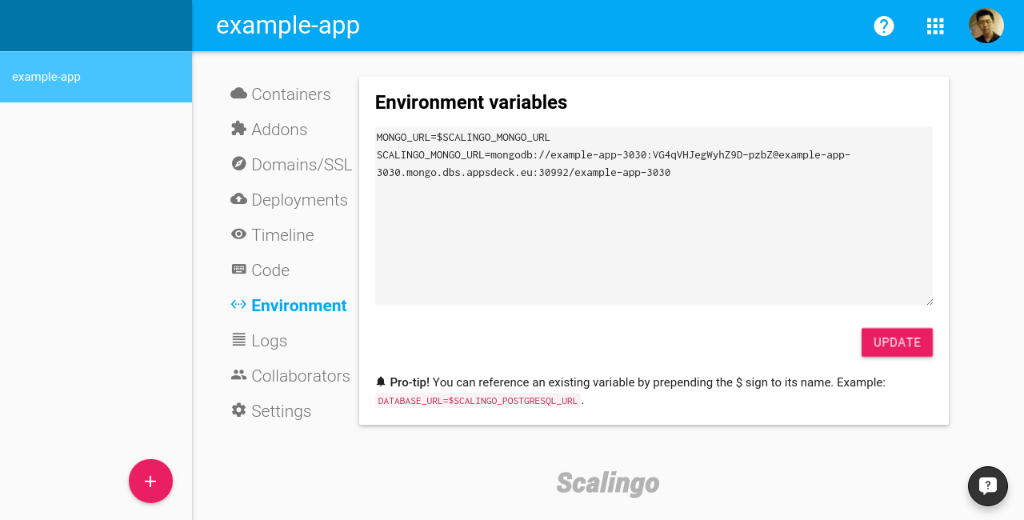
From the Dashboard
- Go to your app on Scalingo Dashboard
- Click on Environment tab
-
MONGO_URLandSCALINGO_MONGO_URLare displayed
From the Command-Line Interface
$ scalingo --app my-app env | grep MONGO

MONGO_URL=$SCALINGO_MONGO_URL
SCALINGO_MONGO_URL=mongodb://my-app-3030:YANs3y07m5_KJC2MSDGebh8tx1lliFWh2Yb239zVqGQvbElWDjIN7QWspVH92Ul8@my-app-3030.mongo.a.osc-fr1.scalingo-dbs.com:30949/my-app-3030
Remote access your database
If you need to access your database from other places than your app please follow the Access your database guide.
Force TLS Connections
MongoDB® support TLS to encrypt all of its network traffic: either between the client and the server or between the different replicas of your database.
By default, all new Scalingo for MongoDB® databases have TLS activated. If you want to
connect to it, use the --ssl option:
mongo --ssl --sslAllowInvalidCertificates "<connection string>"
Some existing databases may not have yet TLS support. To activate TLS, you need to restart the database. Any action leading to the restart will activate TLS (e.g. plan update, upgrade of the database).
TLS is an option, you can still access your database without it if needed.
The --sslAllowInvalidCertificates option is mandatory as the generated
certificates for your databases are
self-signed. If you
want the certificate to be trust-able, you need to download our certification
authority certificate and specify it to the MongoDB® CLI tool.
If you want to force connections to your database to use TLS, head to the database dashboard and click on the toggle button:
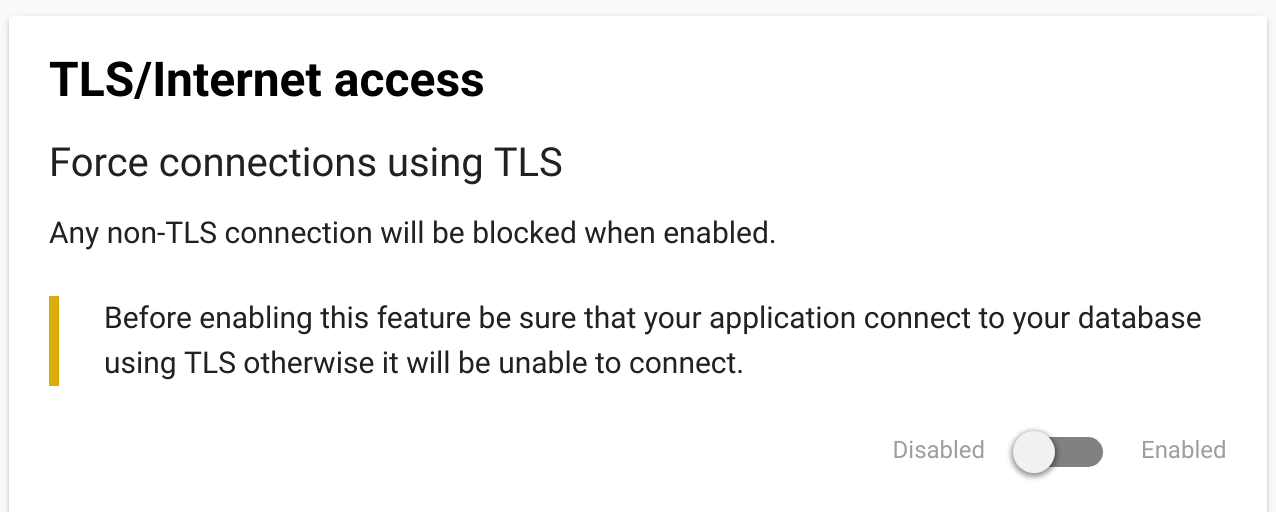
Note that you must have configured your application to use TLS when connecting to the database.
Download the CA Certificate
The certificate of our certification authority is available on the database dashboard.
After downloading it, you can specify its path to the mongo CLI:
mongo --ssl --sslCAFile=/path/to/ca.pem "<connection string>"
Changing Plans
You can upgrade or downgrade your database plan whenever you need it. This operation happens with no manual input. The impact of changing the plan depends on what plans we are talking about:
- When you change the amount of RAM available to your database, your database will be stopped then restarted on a new host with new parameters of the chosen plan. During the operation the connection is dropped between your app and the database. Finally, after the operation is successful, the related app will be restarted.
- When you change from starter to business (keeping the amount of RAM), there is no downtime as only new nodes are added.
From the Dashboard
- Go to your app on Scalingo Dashboard
- Click on Addons tab
- Select the addon you want to change
- In the dialog select the plan you want to upgrade/downgrade to
- Validate your choice
From the Command-Line Interface
To upgrade or downgrade your addon the sub-command is the same: addons-upgrade.
$ scalingo --app my-app addons-upgrade my-app-3030 2g
In this example, my-app-3030 is the ID of the addon, and 2g is the plan we want to upgrade to.
To find out the addon ID:
$ scalingo --app my-app addons

+------------------+------------------+------+
|       ADDON      |        ID        | PLAN |
+------------------+------------------+------+
| MongoDB | my-app-3030      |   1g |
+------------------+------------------+------+
Database Dashboard
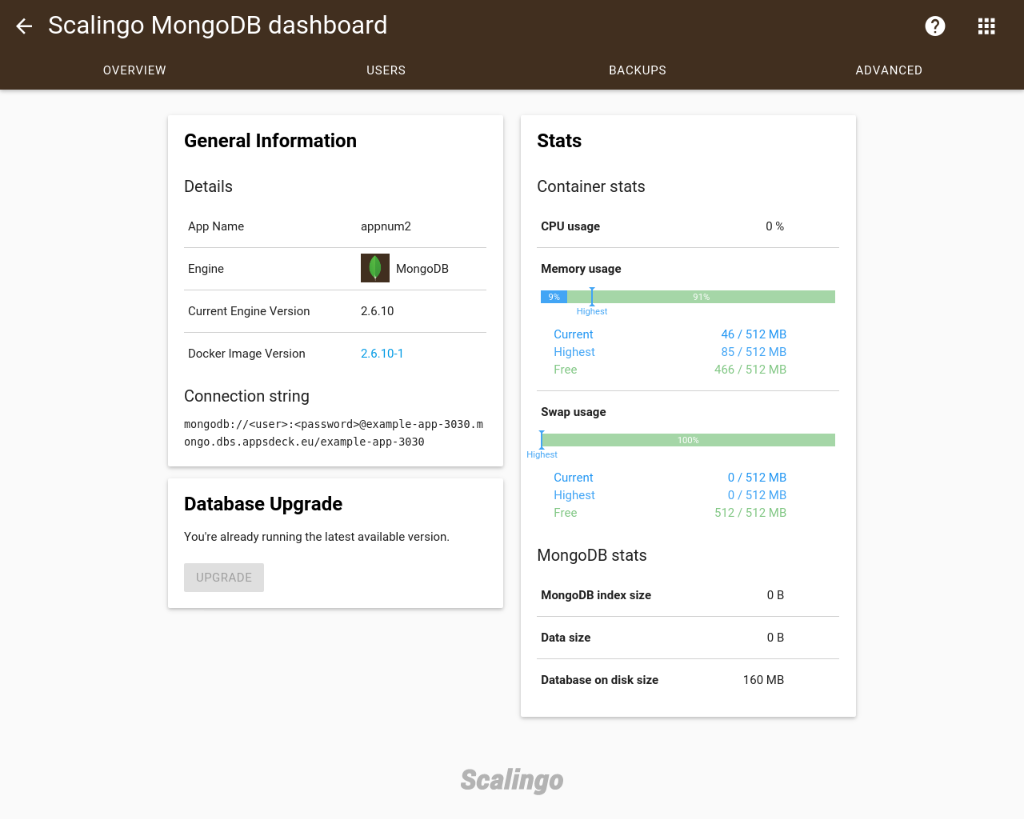
The Scalingo for MongoDB® dashboard is the central place for administrative tasks such as:
- Monitor database and system stats
- Upgrade the database engine version
- Activate database specific features (e.g. Oplog for MongoDB®)
- Manage database users
- Manage backups
Database Upgrade
When the database vendor releases a new version of your database engine, we try to provide it as soon as possible. You have the choice to upgrade your database with one click through your database dashboard.
This operation is similar to changing your database plan: your database is stopped and restarted with the new database version. When this operation finishes, your application is also restarted.
If using a Business plan for your Scalingo for MongoDB® addon, we are able to upgrade your instance to a newer version without downtime. In order to do so, we follow MongoDB® guidelines.
We first upgrade the secondary members of the replica set. Then, the primary member steps down (by issuing a MongoDB® command) to force the election of a new primary amongst the current secondary members. During the election, the replica set cannot receive write commands. This election process usually takes a dozen seconds. Once a new primary is elected, we can safely upgrade the remaining member and set the feature compatibility version to the latest one.
Container Stats
| CPU usage | Current CPU usage. |
| Memory usage | Display the current, hightest and free memory. Highest is the maximum memory recorded since database restarted. |
| Swap usage | Display the current, hightest and free swap. Highest is the maximum swap recorded since database restarted. |
Database Stats
| MongoDB® index size | Index size reported by MongoDB®, for the best performance this value should fit in the memory size. |
| Data size | Logical space reported by the database. |
| Database on disk size | Effective physical space used. |
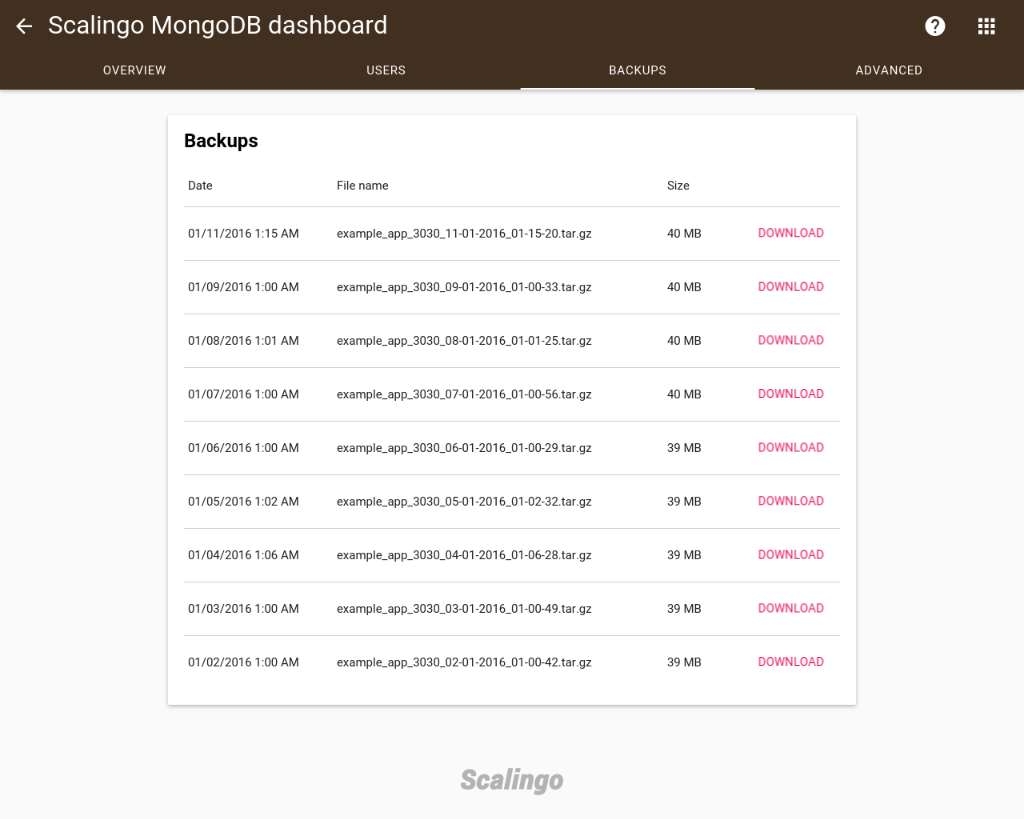
Backups
We automatically make periodic backups of your database on a daily basis, at around 1:00 AM Central European Time (CET or UTC+0100). The time of your daily backup is configurable via the web dashboard of your database or using the CLI. The scheduled date is not strongly enforced: it might get delayed depending on the load on our infrastructure.
Using the Database Dashboard
- From your web browser, open your database dashboard
- Click the Backups tab
- Locate the Backup schedule block
- Click the Schedule button
- Make sure to check the I want to enable scheduled backups checkbox
- Pick an hour (timezone is UTC)
- Validate by clicking the Update button
Using the Command Line
- Make sure you have correctly setup the Scalingo command line tool
- Configure the time of backup:
- By setting an hour:
scalingo --app my-app --addon [YOUR ADDON KIND] backups-config --schedule-at 3In this example, we ask the platform to create the backups at ~03:00. Note: The timezone used is the local timezone of the machine running the command.
- By setting an hour and a timezone:
scalingo --app my-app --addon [YOUR ADDON KIND] backups-config --schedule-at "4:00 UTC"In this example, we ask the platform to create the backup at ~04:00 UTC. The output should look like this:
-----> Periodic backups will be done daily at 6:00 CET
- By setting an hour:
Retention Policy for Daily Backups
We keep a limited amount of backups depending on your database plan. A daily backup is retained for the last 7 days. That means that 7 backups will exist, one for each of the last 7 days. A weekly backup means that only one backup is saved over a 7 days period. A monthly backup means that only 1 backup is saved over the course of a month.
| Plan | Weekly Backups Retained | Monthly Backup Retained |
|---|---|---|
| Starter | 4 weeks | 0 months |
| Business | 8 weeks | 12 months |
Retention Policy for Manual Backups
You can also manually trigger a backup for your database at any time you want. The number of manual backups that you can retain is limited by your plan:
| Plan | Backups Retained |
|---|---|
| Starter | 10 |
| Business | 50 |
In case a database is removed from an application, the retention policy remains untouched: backups are not instantly deleted.
Creating a Manual Backup
Using the Database Dashboard
- From your web browser, open your database dashboard
- Click the Backups tab
- Locate the Backup Settings block
- Click the Make Manual Backup button
- Locate the Backups block
- Click the Trigger manual backup button
Using the Command Line
- Make sure you have correctly setup the Scalingo command line tool
- Ask the platform to backup the database:
scalingo --app my-app --addon [YOUR ADDON KIND] backups-createAfter a while, the output should look like this:
-----> Backup successfully finished
Download Automated Backups
Automated backups are listed in the database specific dashboard.
- Go to your app on Scalingo Dashboard
- Click on Addons tab
- Click Dashboard which will take you to the Scalingo for MongoDB® dashboard
- Click on Backups tab
- Download the backup you want
Manual Database Backup
If you wish to manually backup your database, please follow How to dump and restore my Scalingo for MongoDB® guide.
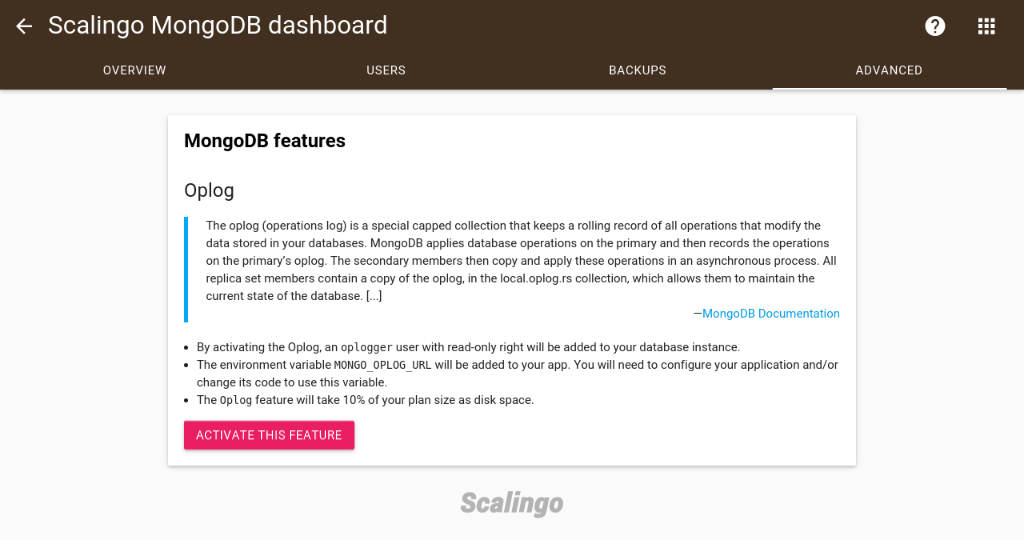
MongoDB® Oplog
Oplog is a MongoDB® feature which logs all the operations achieved on a MongoDB® cluster. This feature is tightly related to MongoDB® replication, but is also used by Meteor to increase app performance. If you wish to use Oplog in your application please refer to the official MongoDB® documentation. Oplog can be enabled from the database dashboard, when activated it will automatically add the MONGO_OPLOG_URL variable in your application.
Activating Oplog
- Go to your app on Scalingo Dashboard
- Click on Addons tab
- Click Link to dashboard which will take you to the MongoDB dashboard
- Click on Advanced tab
Meteor Specific
Meteor uses this feature to sync different instances of an application. Your can read more about how to scale Meteor here.
The variable MONGO_OPLOG_URL is the one used by Meteor. As a result, after activating Oplog you have to restart your application.