Accessing Your Scalingo for MySQL® Addon
Remotely accessing your Scalingo for MSQL® database can sometimes be useful, for example, to conduct investigations, to check or compute data locally, to dump the database content,…
We provide several ways to access your database remotely. Chosing one mostly depends on your needs and preferences.
Using the Interactive Remote Console
- Make sure you have correctly setup the Scalingo command line tool
- From the command line, open a console for your MySQL® addon:
scalingo --app my-app mysql-consoleThe output should look like this:
-----> Starting container one-off-7872 Done in 0.479 seconds -----> Connecting to container [one-off-7872]... -----> Process 'mysql-console my_app_4553' is starting... ---> Download and extract the database CLI ---> Database CLI installed: mysql Ver 8.0.33 for Linux on x86_64 (Source distribution) mysql: [Warning] Using a password on the command line interface can be insecure. Welcome to the MySQL monitor. Commands end with ; or \g. Your MySQL connection id is 496 Server version: 8.0.35 MySQL Community Server - GPL Copyright (c) 2000, 2023, Oracle and/or its affiliates. Oracle is a registered trademark of Oracle Corporation and/or its affiliates. Other names may be trademarks of their respective owners. Type 'help;' or '\h' for help. Type '\c' to clear the current input statement. mysql> - To exit, type the following command from the MySQL® console, or use the
keyboard shortcut
CTRL+D:\q
Using a One-Off
- Start a one-off container
- From the command line, use our
dbclient-fetcherhelper to download and install a bunch of MySQL® tools:dbclient-fetcher mysqlThe output should look like this:
---> Download and extract the database CLI ---> Database CLI installed: mysql Ver 8.0.33 for Linux on x86_64 (Source distribution) - If you ever need a specific version, just add it as a second parameter:
dbclient-fetcher mysql 8The output should look like this:
---> Download and extract the database CLI
---> Database CLI installed:
mysql  Ver 8.0.35 for Linux on x86_64 (Source distribution)
The dbclient-fetcher helper installs the following tools:
mysqlmysqldump
Using Third Party Tools
While using mysql to query and administer a MySQL® database is probably the
ubiquitous choice for a lot of users, it’s not limited to that. The MySQL®
ecosystem indeed offers a very large panel of tools made and provided by
third-parties. For example, some might feel more intuitive because of their
Graphical User Interface. Some are better integrated with others tools, when
some others are more data-visualization centric.
By default, and for security reasons, your MySQL® database is not directly accessible from the Internet and therefore not directly usable with your third-party tool.
To access your database remotely you first need to make it reachable over the Internet:
- either locally, on your computer, via an encrypted tunnel
- or from any location, by enforcing TLS connection and enabling direct Internet access.
Once a secured connection has been established, you should be able to connect to your database with your tool of choice. If you don’t have one yet, we suggest you to take a look at DBeaver or MySQL Workbench.
Making the Database Reachable Over Internet
Using Our Command Line Tool
Our command line tool provides a db-tunnel command that creates an SSH
encrypted tunnel between the computer running the command and our platform,
allowing remote secured access to your MySQL® addon.
- Make sure you have correctly setup the Scalingo command line tool
- Make sure you have correctly setup SSH authentication on your Scalingo account
- From the command line, open the tunnel using this command:
scalingo --app my-app db-tunnel SCALINGO_MYSQL_URLThe output should look like this:
Building tunnel to my-app-4553.mysql.a.osc-fr1.scalingo-dbs.com:35581 You can access your database on: 127.0.0.1:10000 - The database is now reachable from
127.0.0.1on port10000 - To specify the port number to bind to (default is
10000), use the--portoption:scalingo --app my-app db-tunnel SCALINGO_MYSQL_URL --port 12345 - To close the tunnel, use the keyboard shortcut
CTRL+C:^Cinterrupt catched, aborting…
Using OpenSSH
Our command line tool handles it in a single command, but you might want to use the tunnel without it. With the standard OpenSSH client, the way to build the tunnel is:
- Identify the connection URI for your database
- Make sure to understand how the connection URI is built
- From the command line, run the following command to create the tunnel:
ssh -L <local_port>:<db_url>:<db_port> git@<ssh_hostname> -p 22 -NWith:
-
local_port: local port number you want to bind to -
db_url: URL of your database, from the environment variable -
db_port: port -
ssh_hostname: depends on your region:- For
osc-fr1:ssh.osc-fr1.scalingo.com - For
osc-secnum-fr1:ssh.osc-secnum-fr1.scalingo.com
- For
- (the SSH user is always
gitand the SSH port is always22)
The output should stay blank
-
- The database is now reachable from
127.0.0.1onlocal_port
Enabling Direct Access Over Internet
- Make sure you have TLS enforced
- From your web browser, open your database dashboard
- Select the Overview tab
- Locate the TLS/Internet Access block
- Enable the Internet Accessibility option
- The database is now available using the corresponding connection URI
Using DBeaver
DBeaver is a free and open-source database tool allowing to manage multiple database kinds, including MySQL®. It includes a carefully designed and implemented User Interface, as well as a lot of features such as the ability to execute SQL queries with autocompletion and syntax highlighting, the ability to browse and edit database structure, data import/export, etc.
Accessing Through a DB Tunnel
- Create a DB tunnel to make the database reachable from the computer running DBeaver
- Once the connection established, open DBeaver
- From the main menu, click the New Connexion button and select MySQL from the dropdown
- In the new window, select the Main tab and fill the required
information:
- Server Host is now
127.0.0.1orlocalhost - Port is most probably
10000, unless you set it to something else - Database must be gathered from the connection URI
- Username and Password must also be gathered from the connection URI
- Server Host is now
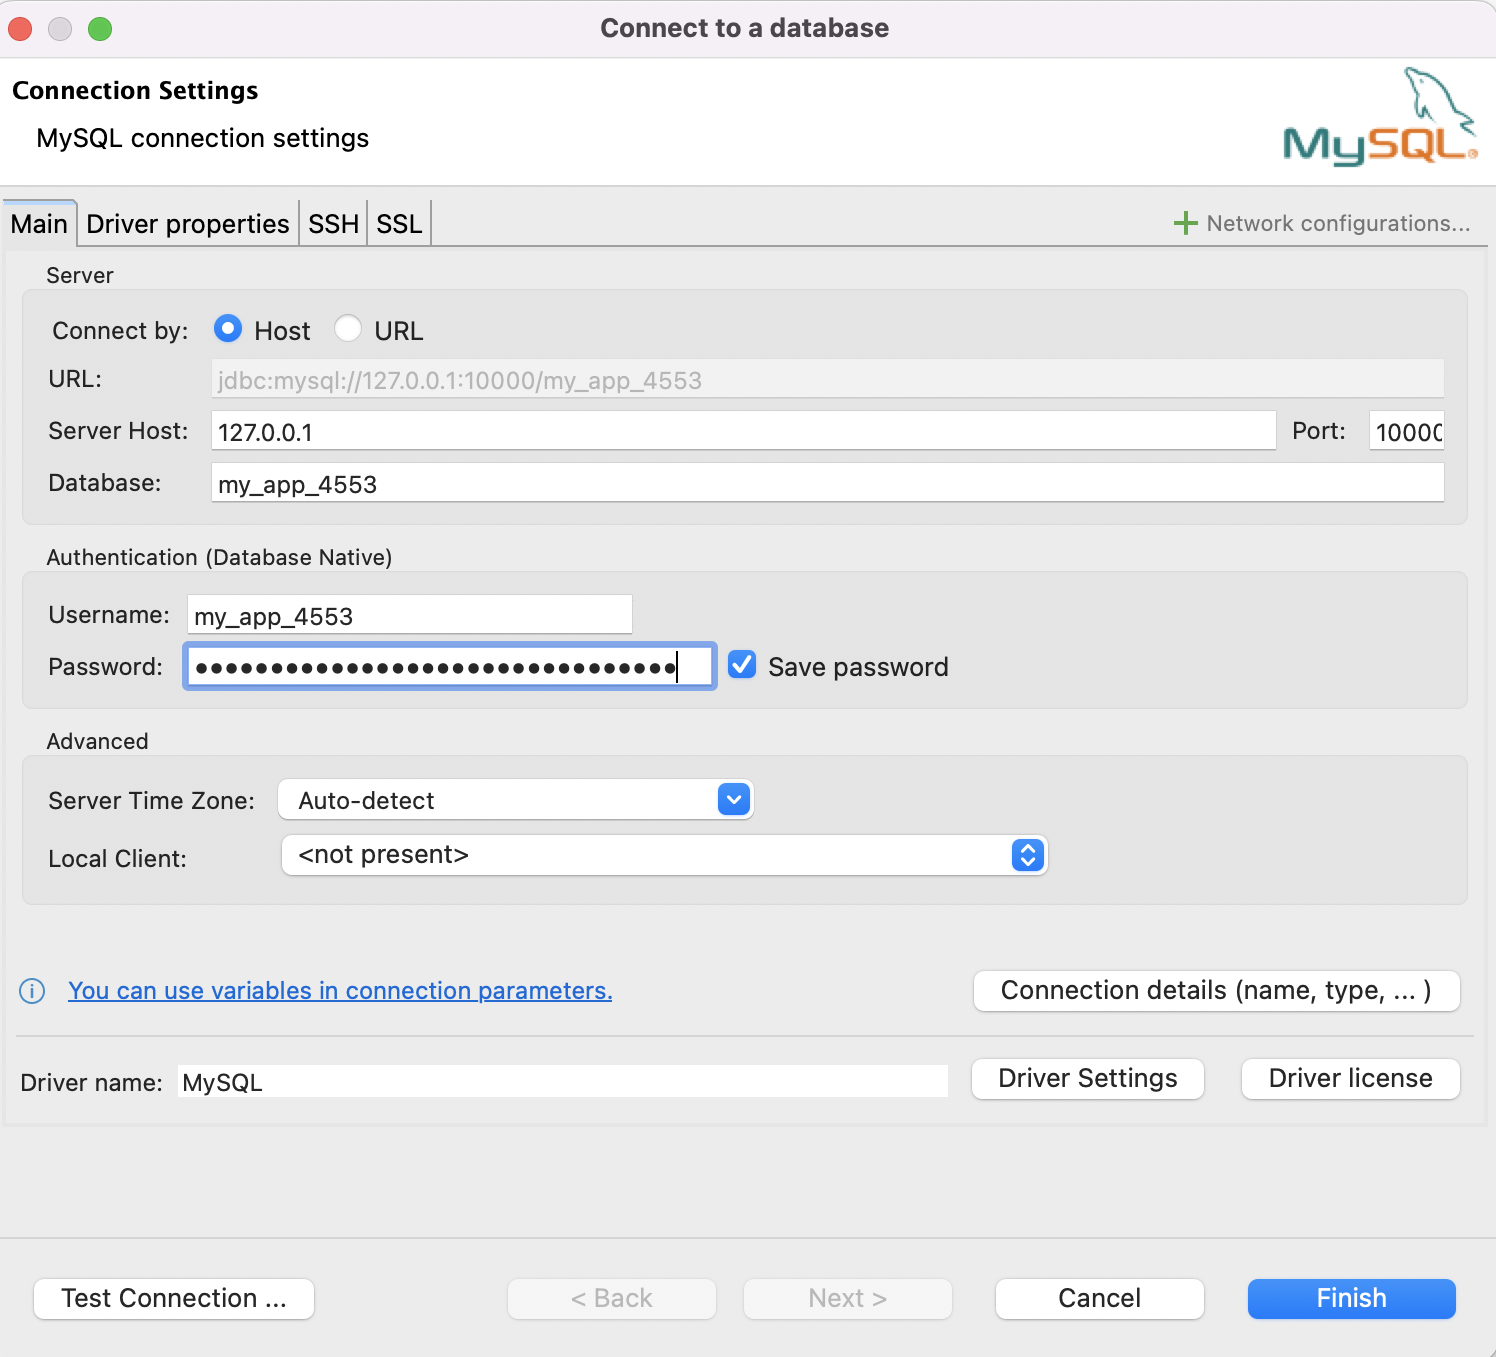
- Click the Test Connection… button at the bottom left to test that everything works as expected
- Click the Finish button to save the connection configuration
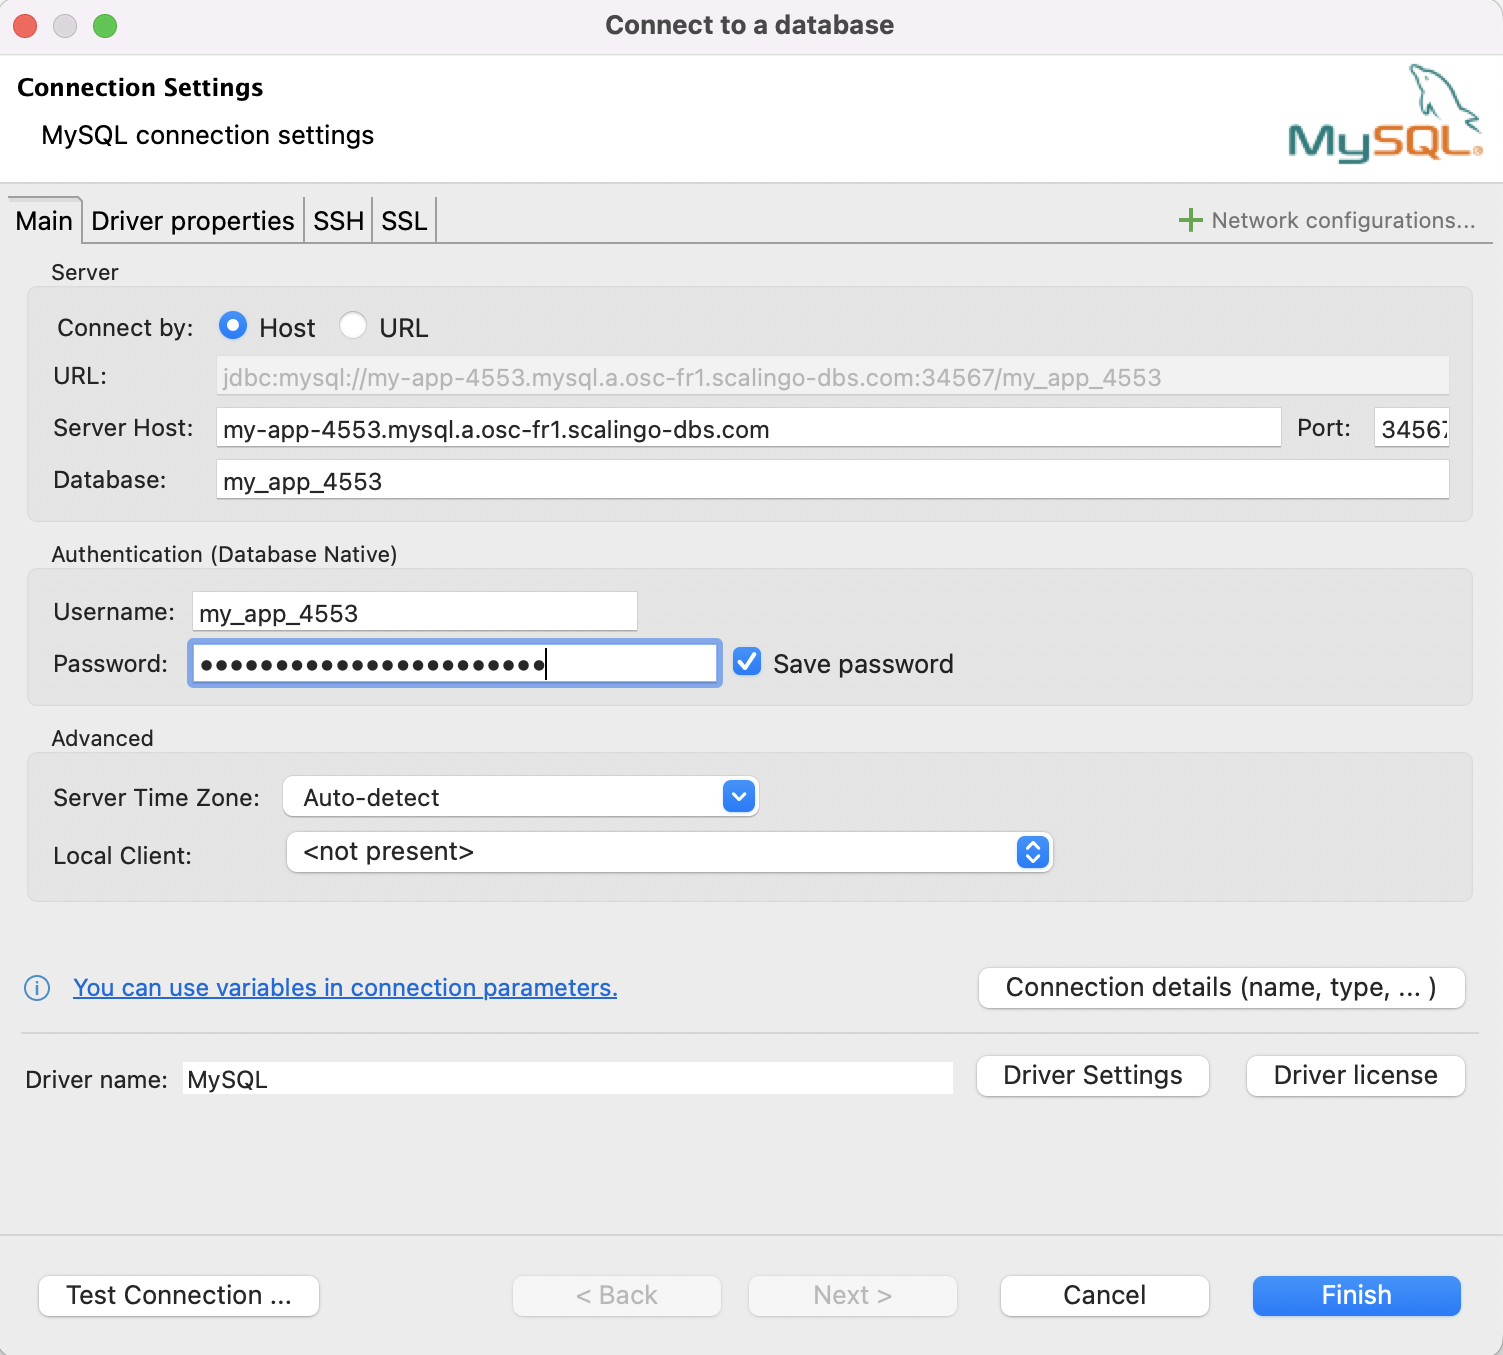
Accessing Through SSH
DBeaver also allows to connect to the database through an SSH tunnel, like described above.
- Open DBeaver
- From the main menu, click the New Connexion button and select MySQL from the dropdown
- In the new window, select the Main tab and fill the required
information:
- Server Host, Port, Database, Username and Password must be gathered from the connection URI
- Select the SSH tab and toggle the Use SSH Tunneling option
- Fill in the required information:
- Tunnel host depends on your region:
- For osc-fr1:
ssh.osc-fr1.scalingo.com - For osc-secnum-fr1:
ssh.osc-secnum-fr1.scalingo.com
- For osc-fr1:
- Tunnel port must be set to
22 - Username is always
git - Authentication Method: chose
Public Key - Select the SSH private key linked to your Scalingo account
- Set your SSH key passphrase, if any
- Tunnel host depends on your region:
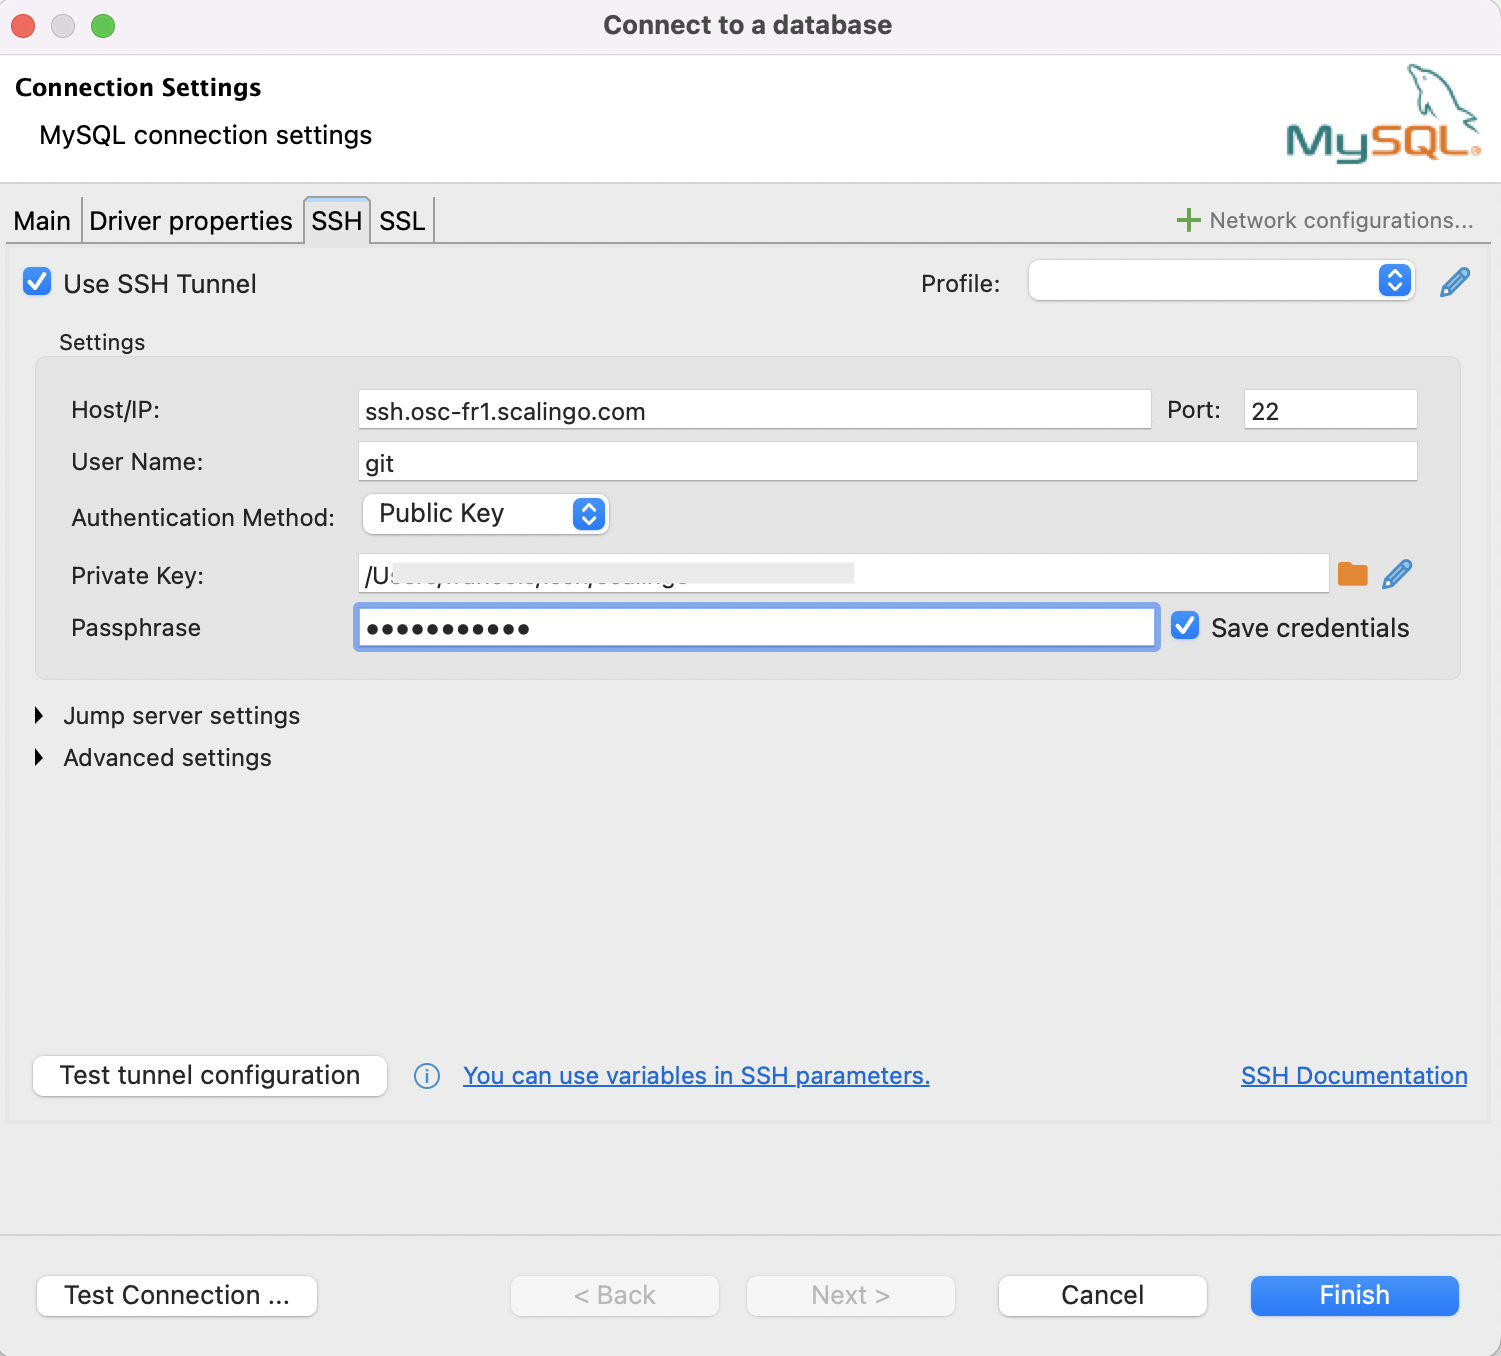
- Click the Test tunnel configuration button to test the SSH connection
- Click the Test Connection… button at the bottom left to test that the database is indeed reachable through the SSH tunnel
- Click the Finish button to save the connection configuration
Using MySQL Workbench
MySQL Workbench is a unified visual piece of software for database architects, administrators and developers. Apart from the basic features such as browsing and editing the database structure, importing and exporting data or executing SQL queries with autocompletion and syntax highlighting, MySQL Workbench also comes with functionalities that help identify and fix performance issues.
Accessing Through a DB Tunnel
- Create a DB tunnel to make the database reachable from the computer running MySQL Workbench
- Once the connection established, open MySQL Workbench
- From the welcome screen, click the little + button to create a new connection
- In the new window, give a name to the connection
- Fill in the required information:
- Connection Method must be set to
Standard (TCP/IP) - Hostname is
127.0.0.1orlocalhost - Port is most probably
10000, unless you set it to something else - Username and Password must be gathered from the connection URI
- Default Schema is the name of your database, which must also be gathered from the connection URI
- Connection Method must be set to
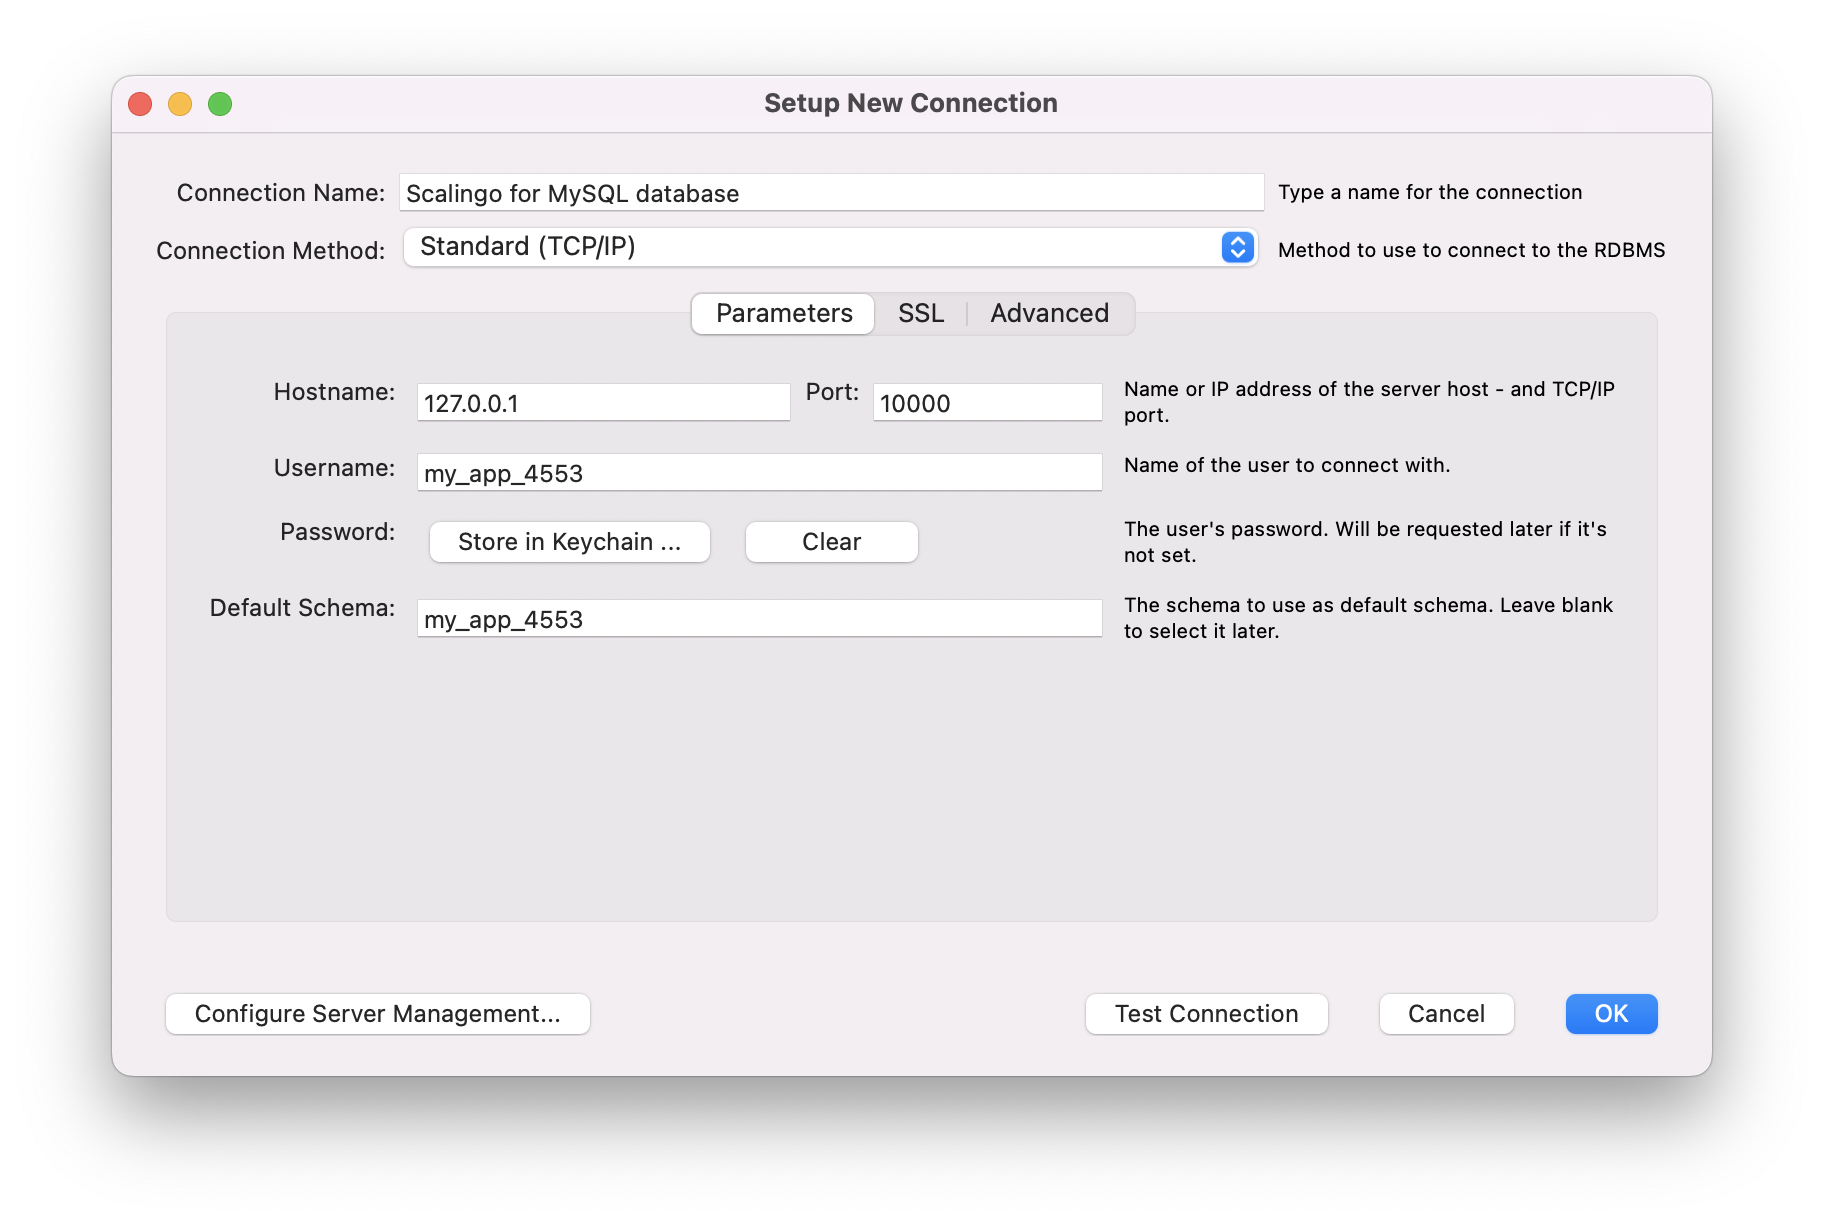
- Click the Test Connection button at the bottom to test that everything works as expected
- Click the OK button to save the connection configuration
Accessing Through SSH
MySQL Workbench also allows to connect to the database through an SSH tunnel, like described above.
- Open MySQL Workbench
- From the welcome screen, click the little + button to create a new connection
- In the new window, give a name to the connection
- Fill in the required information:
- SSH Hostname depends on your region:
- For osc-fr1:
ssh.osc-fr1.scalingo.com:22 - For osc-secnum-fr1:
ssh.osc-secnum-fr1.scalingo.com:22
- For osc-fr1:
- SSH Username is always
git - Chose the SSH Key File linked to your Scalingo account
- MySQL Hostname, MySQL Server Port, Username and Password must be gathered from the connection URI
- SSH Hostname depends on your region:
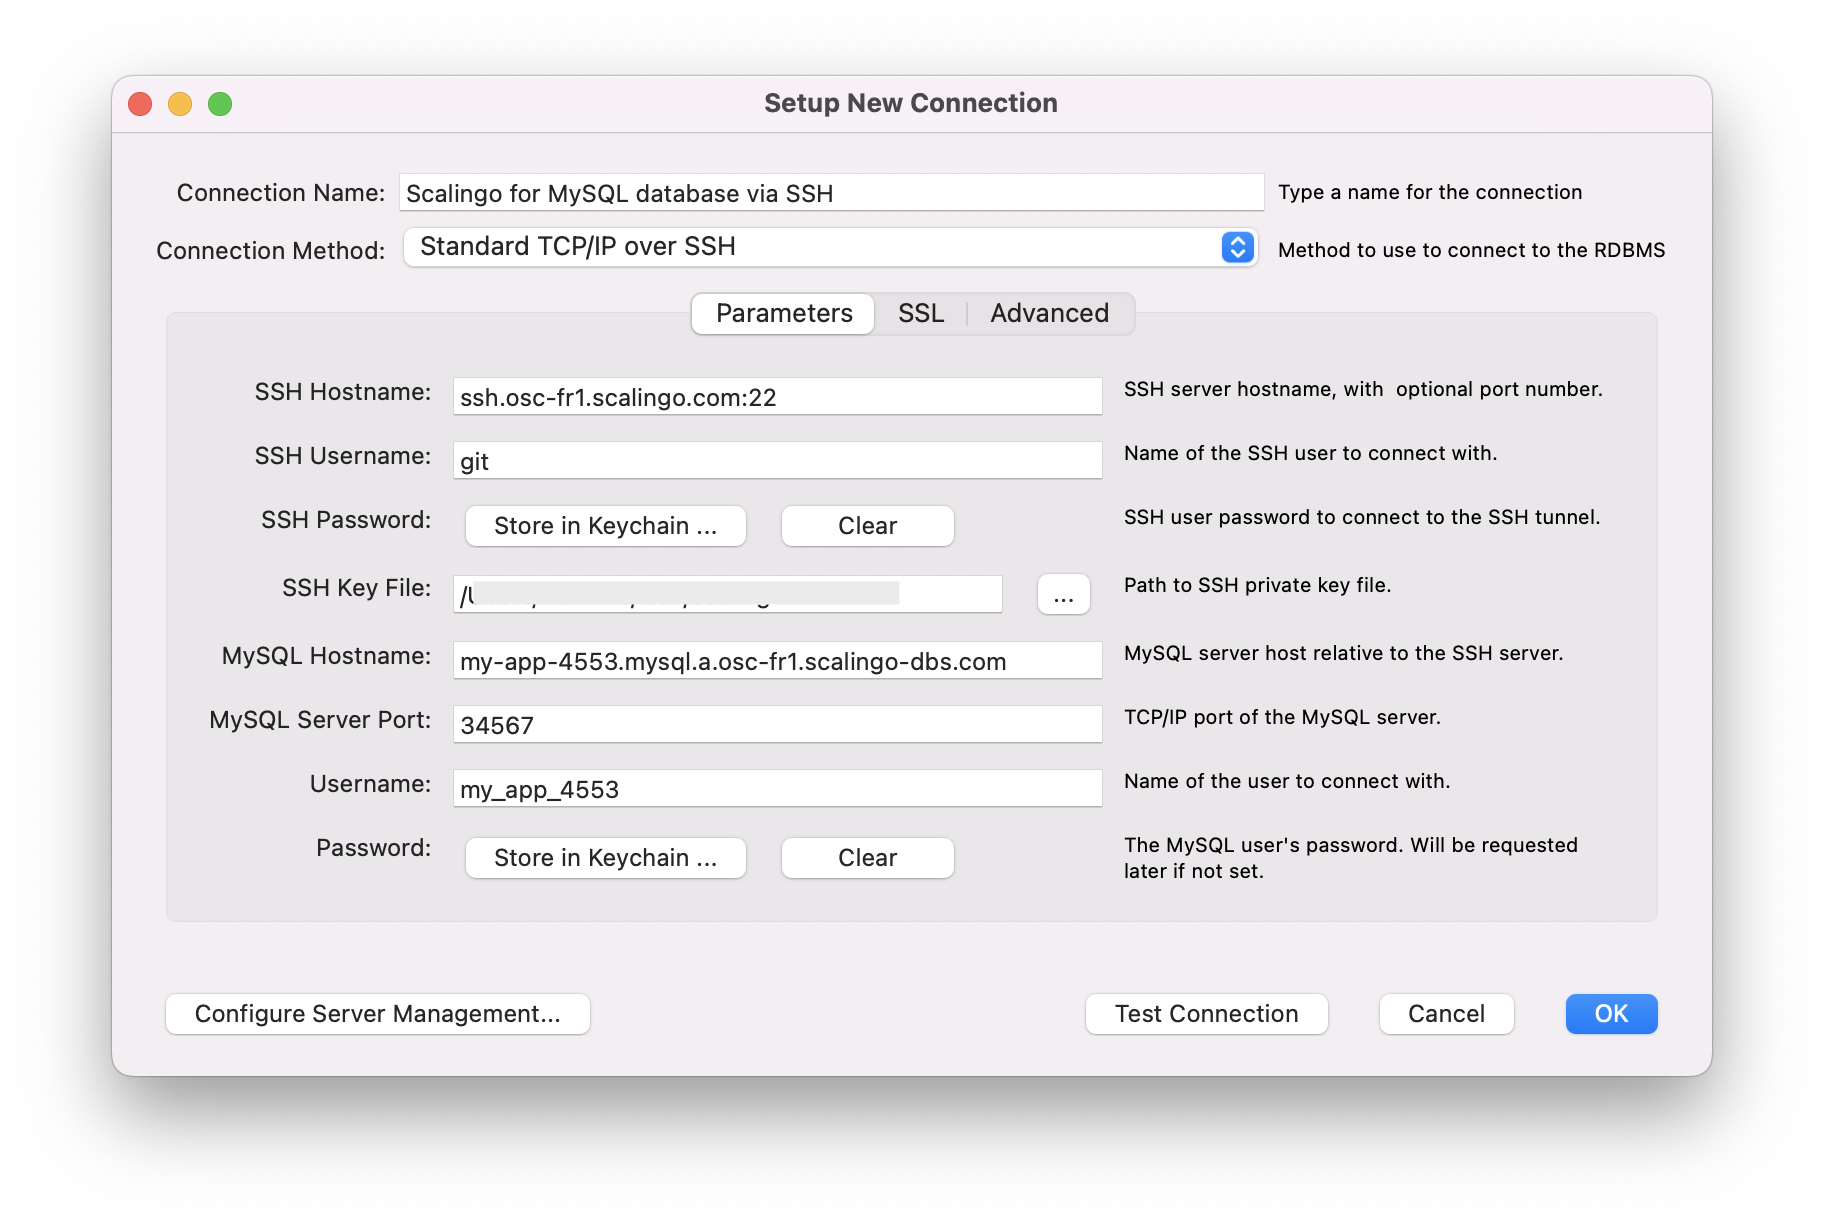
- Click the Test Connection button at the bottom to test that everything works as expected
- Click the OK button to save the connection configuration